How to add ads to your app: AdMob and AdSense step by step
You can earn money with Google ads in any app you built on Fabapp, without writing code. You set everything up in the Ads stage of the Studio: the accounts, the formats, how often an ad can show and where it never shows. The money goes straight to your Google account, and Fabapp keeps no share of it. It needs the Builder plan.
This guide shows every step. The screens come from the real Studio, in a demo project called Aurora, a fictional booking app. The account IDs in the images are made up.
What you need before you start
- an app published on Fabapp (ads run on the published version);
- the Builder plan or higher;
- a Google AdMob account, for ads in the app downloaded from the App Store and Google Play;
- a Google AdSense account, if you want ads on the website and inside the content, plus your own domain connected to the app;
- for the store app, the app already set up in the Mobile app stage (the Studio guide explains how; see also how to publish on Google Play and on the App Store).
An honest word before the first step: ads earn according to how many people use the app every day. A small app earns little from ads. If your app is still growing, also read how to make money with an app, which compares ads with subscriptions and sales.
AdMob or AdSense: which shows where
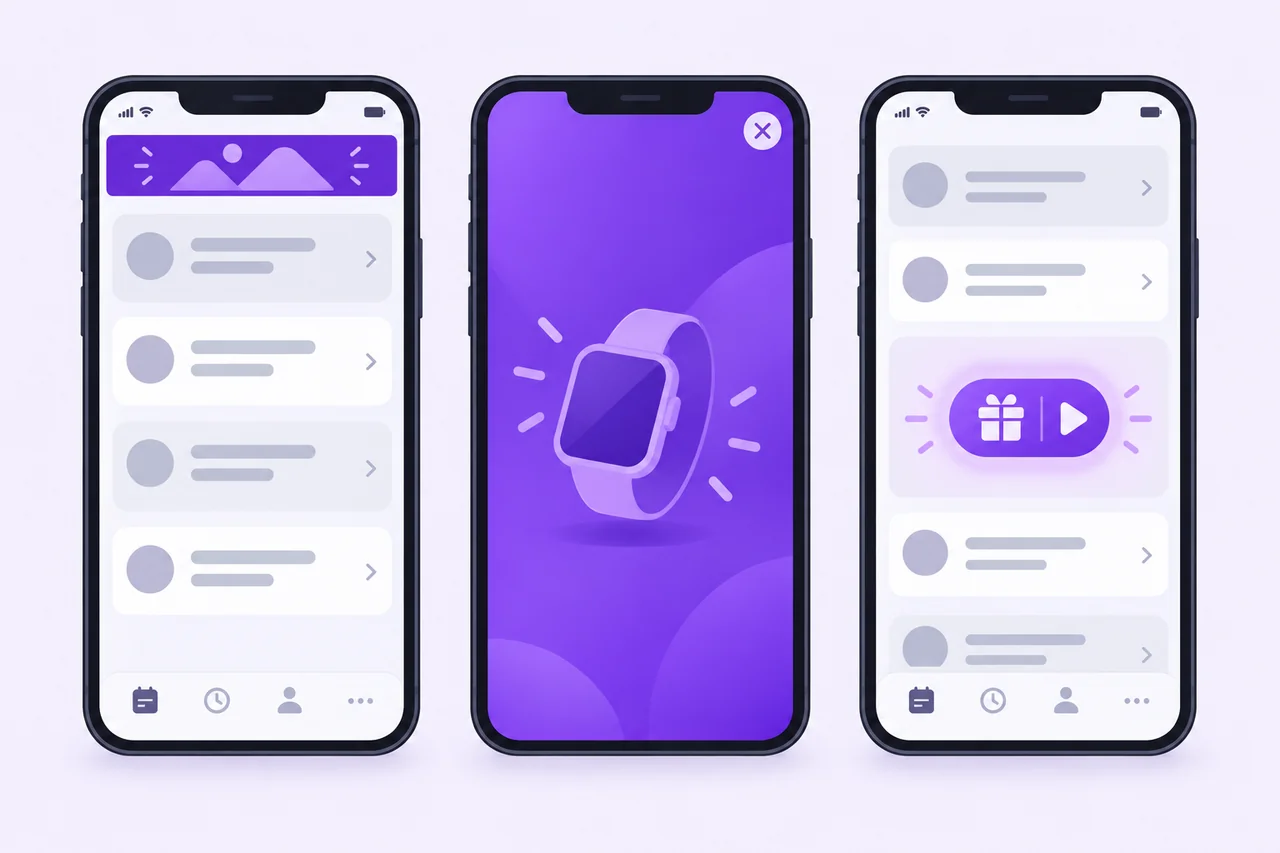
Google has two ad products, and each one covers a different place. The rule is Google's, not Fabapp's: a website ad can only run inside an app that is registered with Google's ads kit.
| Where people use the app | Who shows the ads | Formats |
|---|---|---|
| App downloaded from the App Store or Google Play | AdMob | fixed banner, full screen, rewarded video, app open |
| Browser and app installed from the home screen | AdSense | auto ads and slots inside the content |
| Store app, with the option turned on (Step 11) | AdSense | the same slots inside the content |
Step 1: open the Ads stage
In the project editor, click Ads in the column of icons on the left. The first tab, Overview, shows the two cards (Store app and Site and web app), a warning when something is missing, and the What is left list, which marks each step as done.
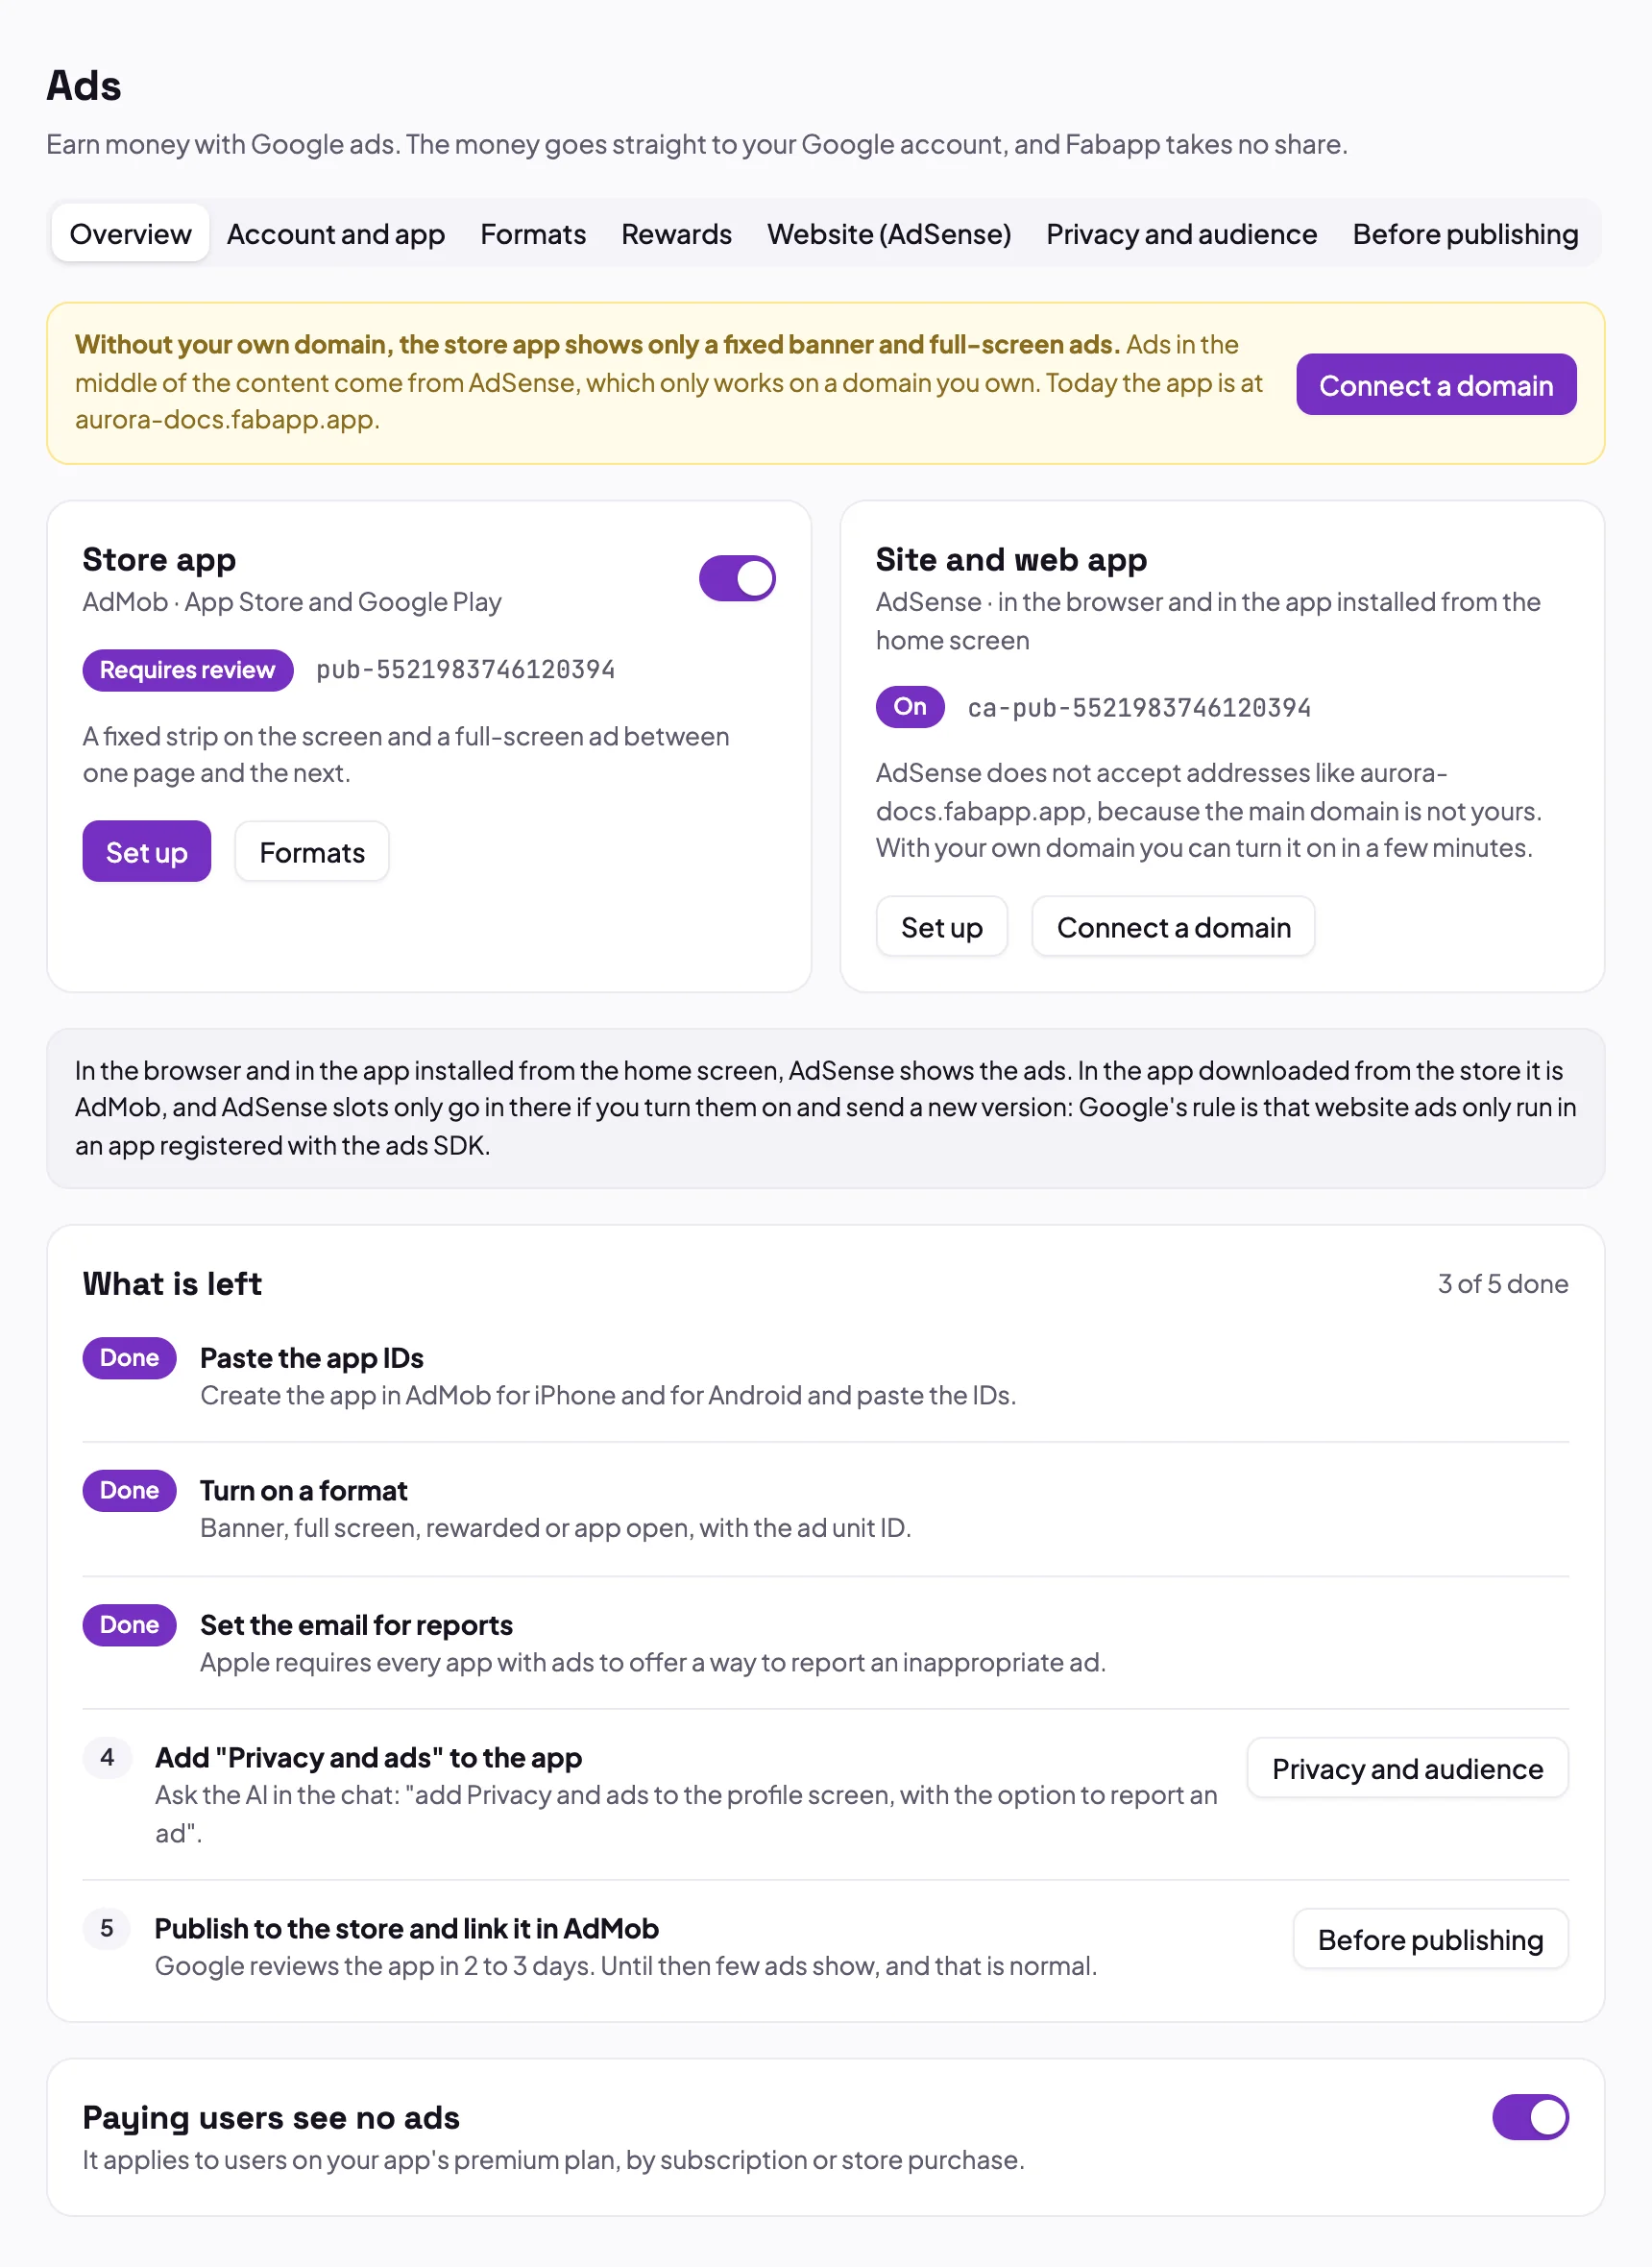
The Store app card has the switch that turns all AdMob ads on or off at once. It only turns on after you paste the app IDs, in the next step.
Step 2: create the app in AdMob and paste the IDs
AdMob identifies your app by an App ID. You need to create two apps in AdMob, one for iPhone and one for Android, even if it is the same app.
- Go to admob.google.com with your Google account and accept the terms;
- click Apps, then Add app, choose iOS and answer that the app is not published yet (if that is the case);
- give the app a name and finish. Repeat for Android;
- under Apps › App settings, copy the App ID, in the format
ca-app-pub-0000000000000000~0000000000; - in the Studio, open the Account and app tab and paste each ID into its field.
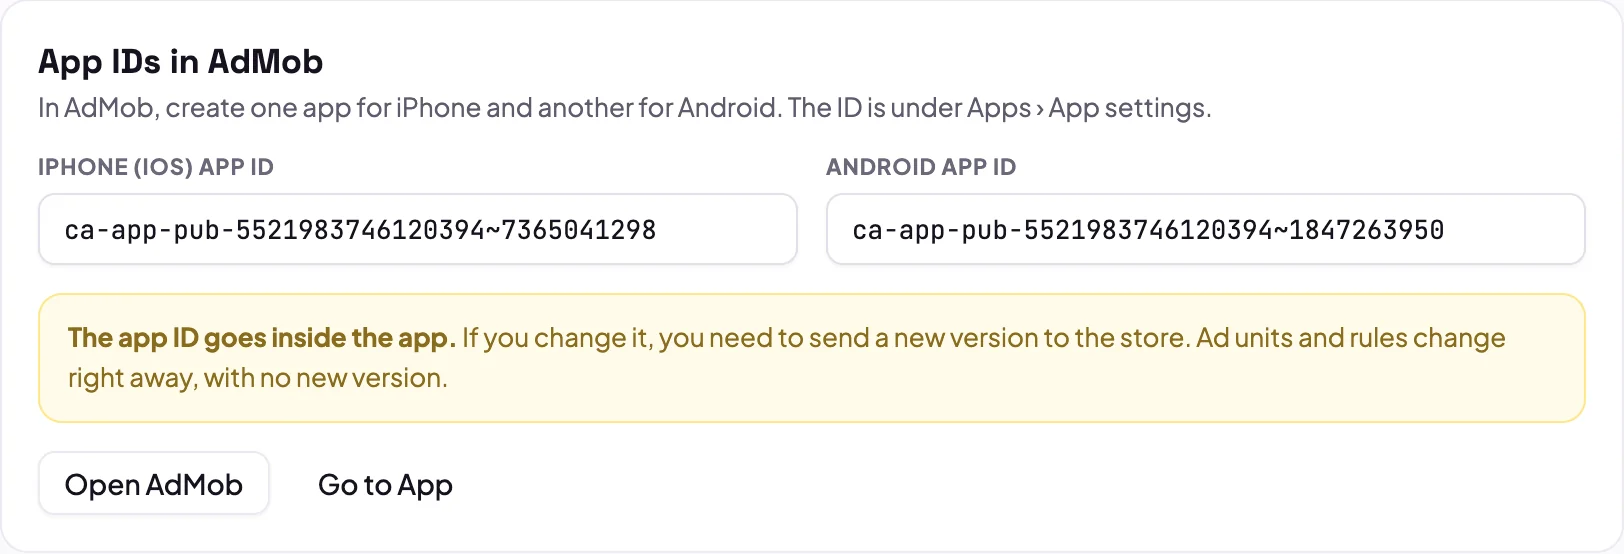
The app ID goes inside the app. If you change the ID later, you need to send a new version to the store. Everything else (ad units, formats, limits) changes without a new version, the next time the app opens.
Both IDs must come from the same AdMob account. If you paste IDs from different accounts, the Studio refuses them and tells you why.
Step 3: the app-ads.txt file and the app's website in the store
app-ads.txt is a public file that proves to advertisers that the app is yours. Without it, the app earns much less,
because many advertisers do not buy space in an app that lacks this file.
Fabapp publishes the file for you, at your app's address. What is left is telling the stores what that address is:
- in Google Play Console: Store presence › App details › Website;
- in App Store Connect: App information › Marketing URL.
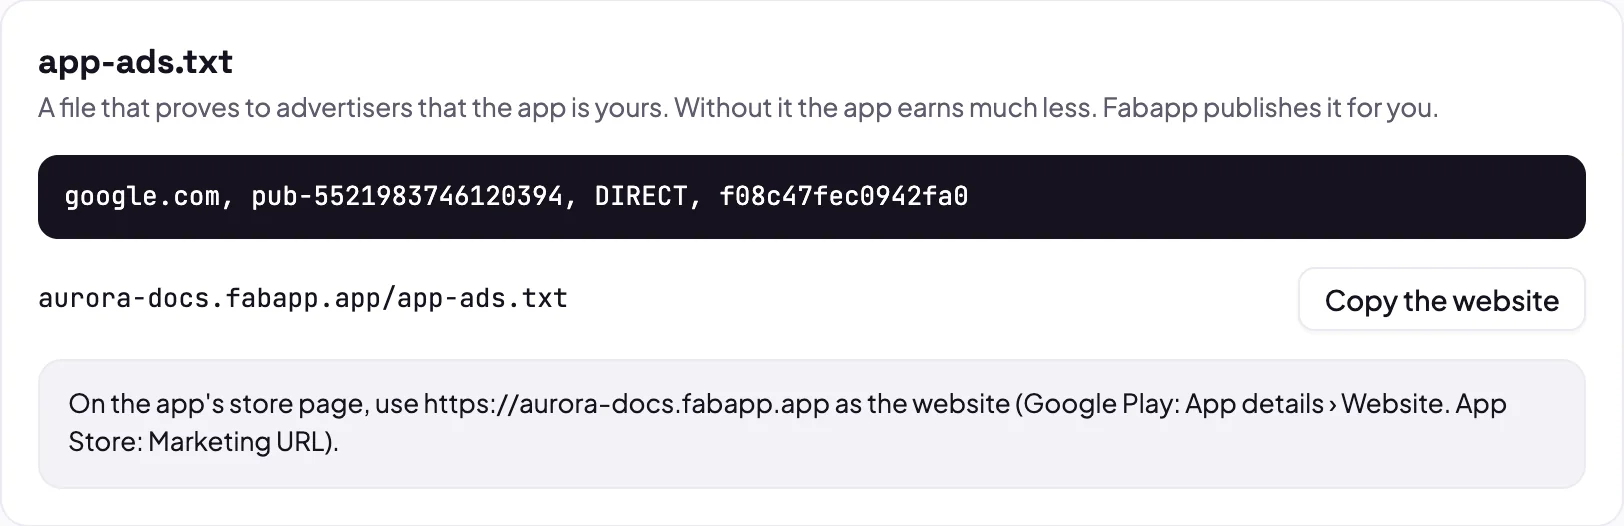
Use exactly the address the screen shows, with the Copy the website button. That is where the AdMob crawler looks for the file.
Step 4: the banner
The banner is a fixed strip on the screen that does not cover the content. It hides on its own when the keyboard opens.
- In AdMob, open the iOS app, click Ad units › Add ad unit and choose Banner. Copy the ad unit ID, in the
format
ca-app-pub-0000000000000000/0000000000; - repeat in the Android app;
- in the Studio, on the Formats tab, turn on the Banner and paste both IDs.
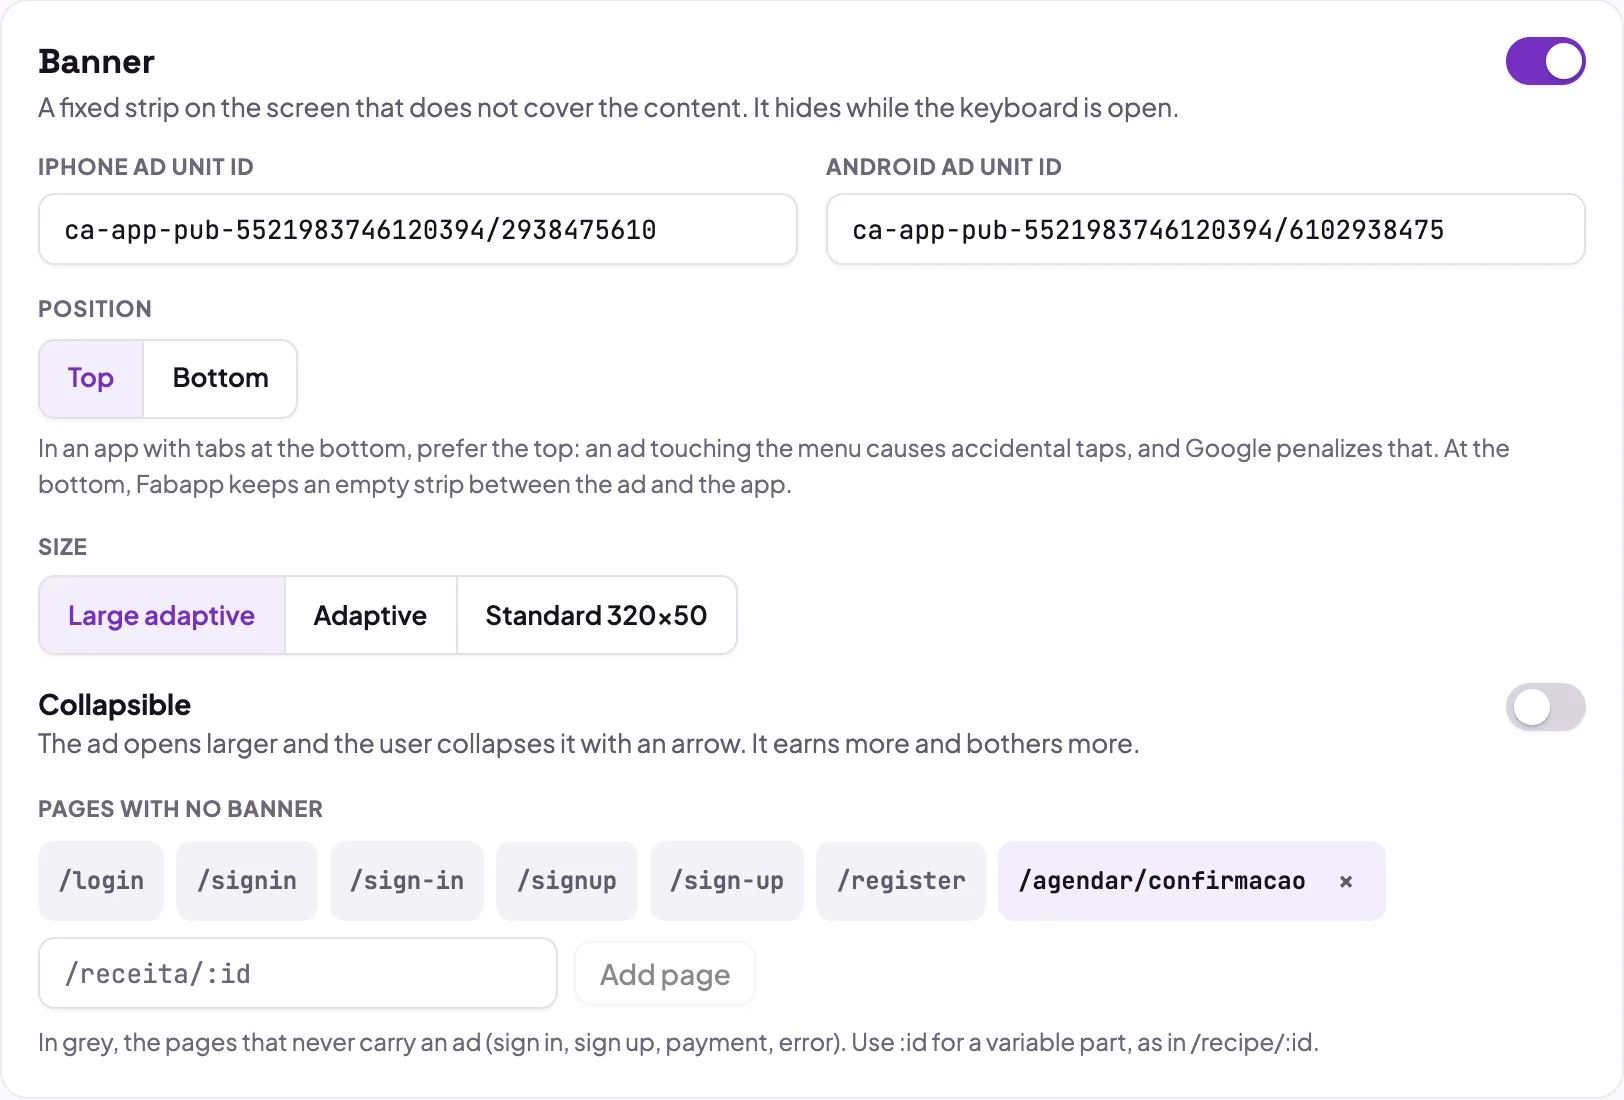
The card's options:
- Position: in an app with tabs at the bottom, keep Top. An ad right next to the menu causes accidental taps, and Google penalizes that. If you choose Bottom, Fabapp leaves an empty strip between the ad and the app;
- Size: Large adaptive earns more on most devices;
- Collapsible: the ad opens larger and the user collapses it with an arrow. It earns more, but it is more annoying;
- Pages with no banner: the pages in gray (sign-in, sign-up, payment, error) never have ads. Add your own, using
:idfor a part that changes, such as/servico/:id.
Step 5: the full-screen ad (interstitial)
This is the ad that fills the whole screen between one page and the next. It earns well, but too many of them make people leave the app. Create an Interstitial ad unit in AdMob for each platform, as in the previous step, and paste the IDs into the Interstitial card.
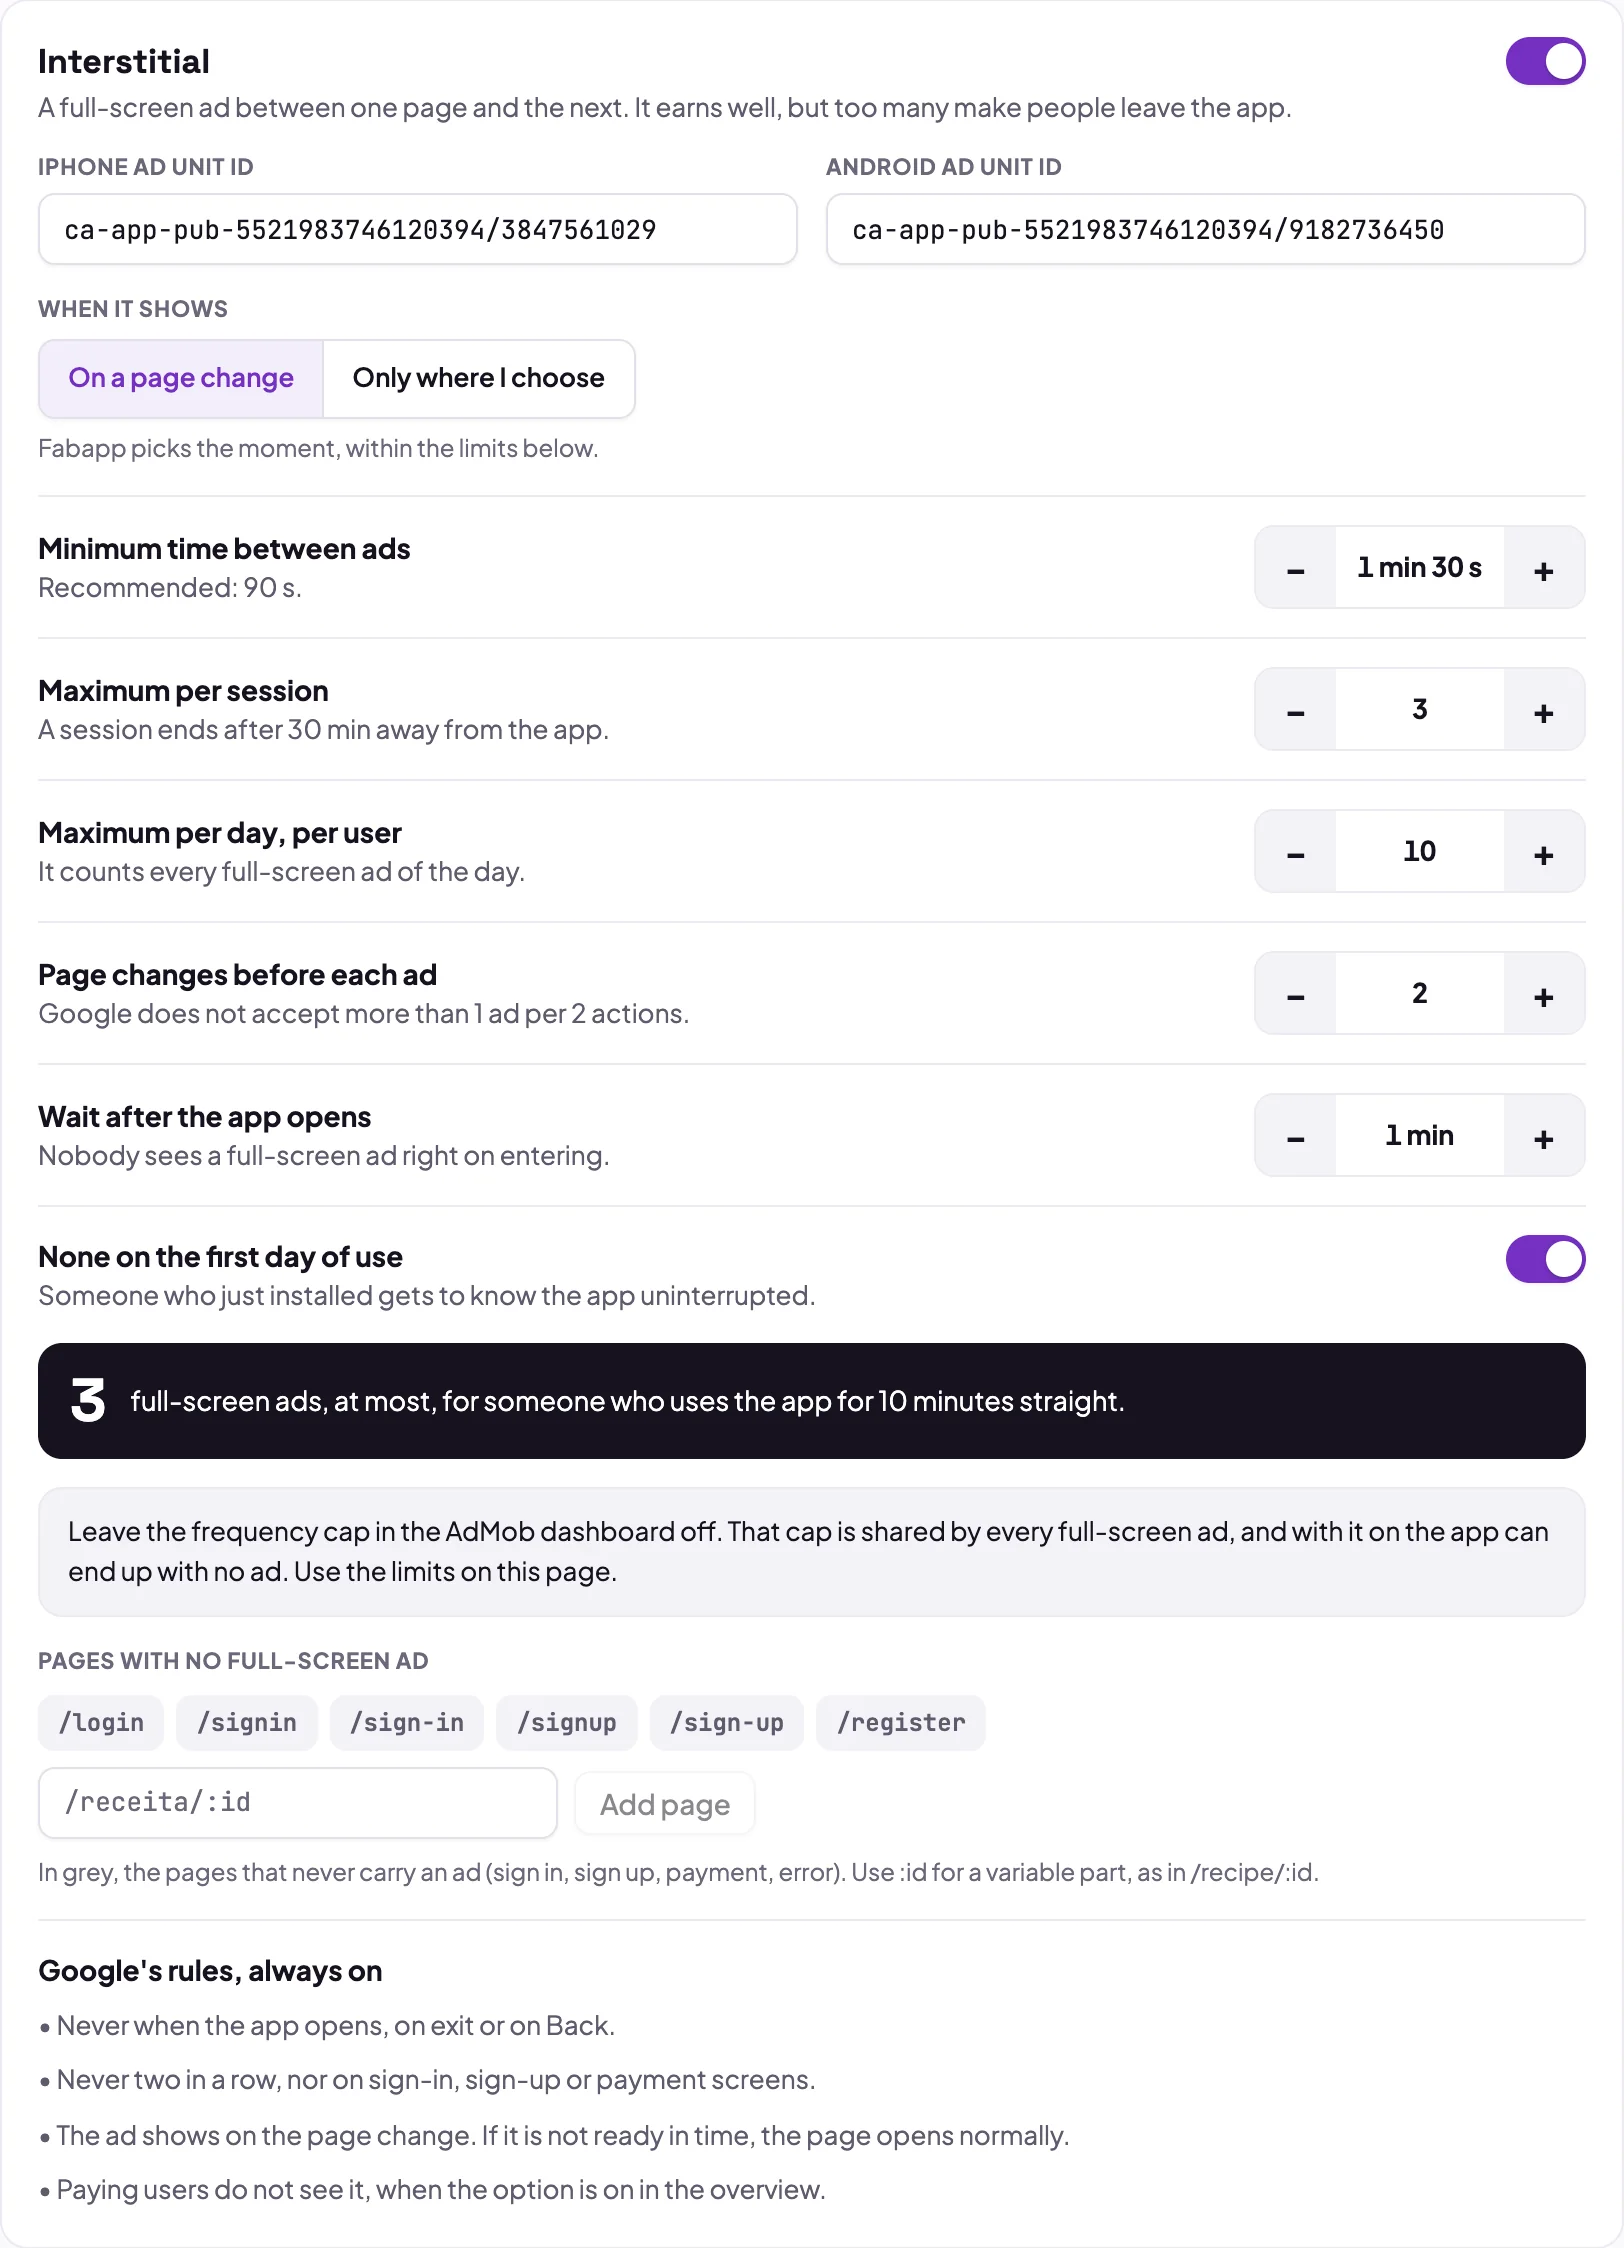
Under When it shows you choose:
- On a page change: Fabapp picks the moment, within the card's limits;
- Only where I choose: the ad only shows at the moments you ask the AI for, for example "show an ad when the user finishes booking".
The limits come set to a safe value. The most important one is the Minimum time between ads (the recommended value is 90 seconds). Below the limits, the card shows the most full-screen ads someone can see in 10 straight minutes of use: it is the easiest way to tell whether you are overdoing it.
Some of Google's rules are always on, and you cannot turn them off: never when the app opens, on exit or on Back; never two in a row; never on sign-in, sign-up or payment screens.
Leave the frequency cap in the AdMob dashboard turned off. There, a single cap covers every full-screen ad, and when it is on it can leave the app with no ads. Use the Studio's limits instead.
Step 6: the app open ad
It shows full screen when the user comes back to the app after some time away. It comes turned off, because it is the first thing they see: turn it on with care.
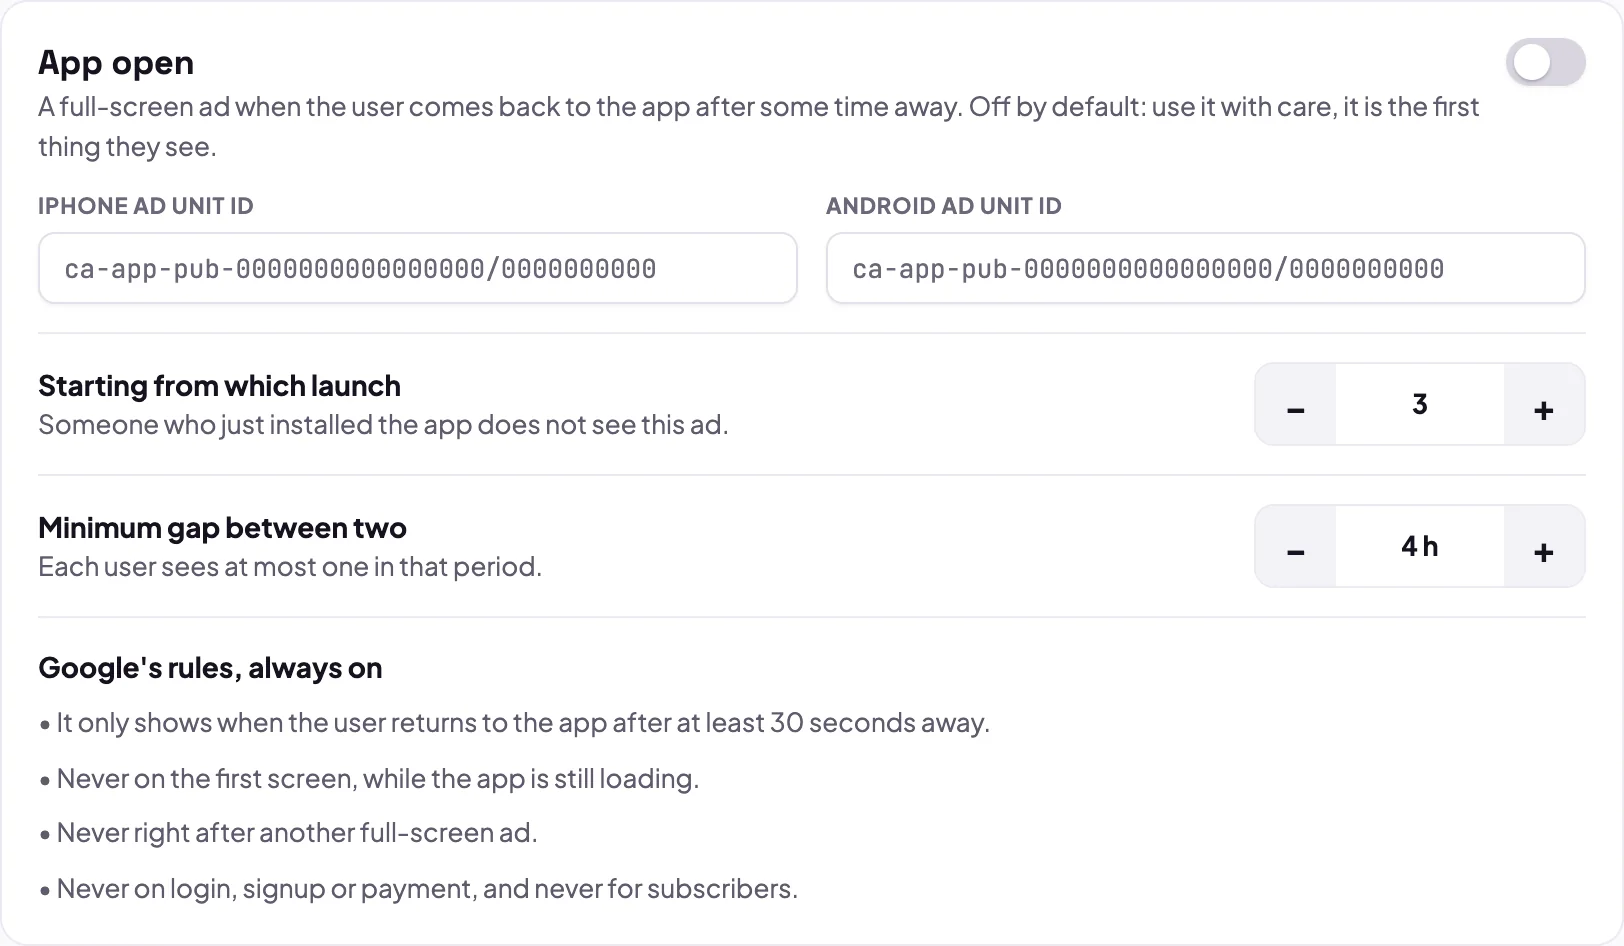
Create an App open ad unit in AdMob, paste the IDs, and choose from which launch it starts (someone who just installed the app does not see it) and the minimum gap between two. This format is not allowed in an app made for children.
Step 7: rewarded ads
With a rewarded ad, the user chooses to watch a video in exchange for something in the app: a credit, content unlocked for a few hours, a tip. It is the format that earns the most per view and annoys the least, because nobody is interrupted.
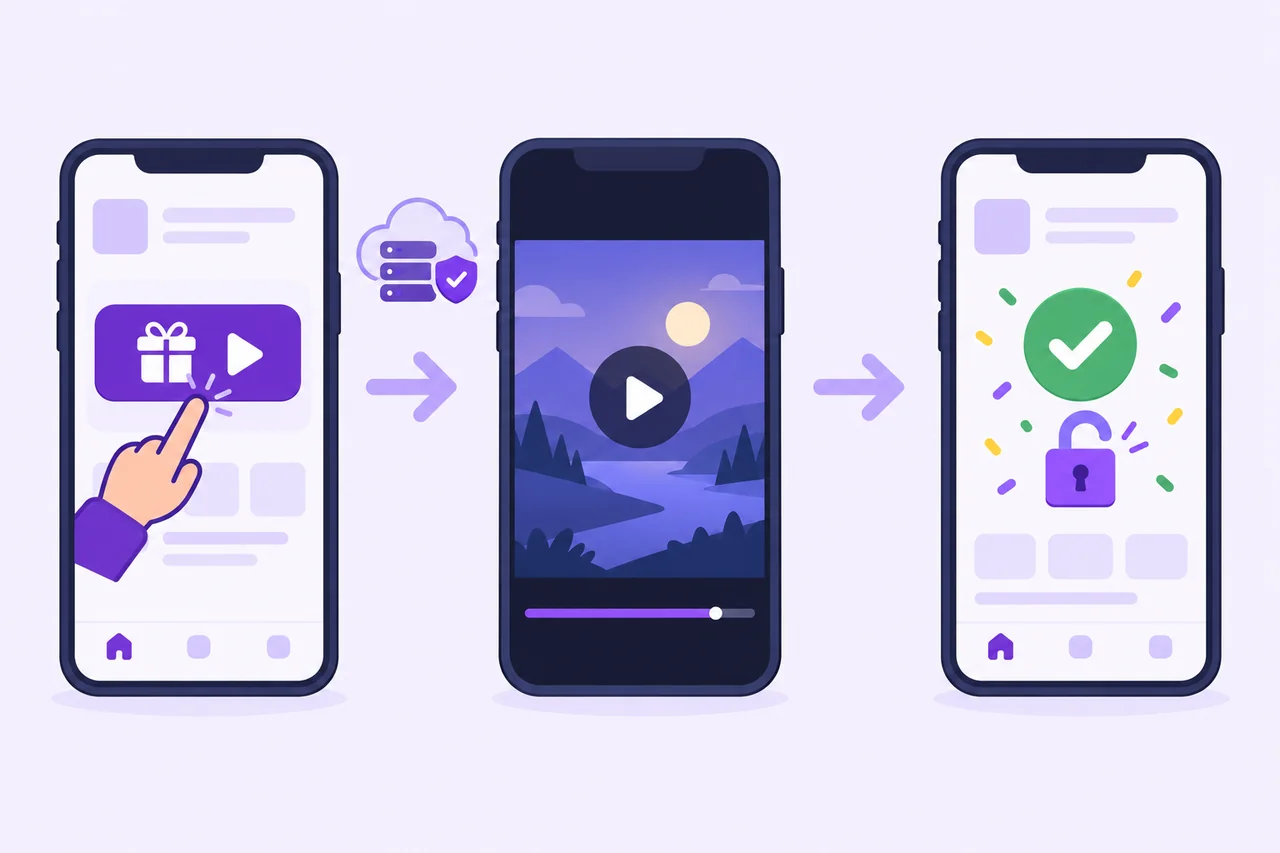
7.1 Say what the user gets
On the Rewards tab, under What the user gets, create a reward for each place in the app where the ad will be offered. The text you write is what the button promises, so be specific: "WhatsApp reminder unlocked for 24 hours" works better than "Win a prize".
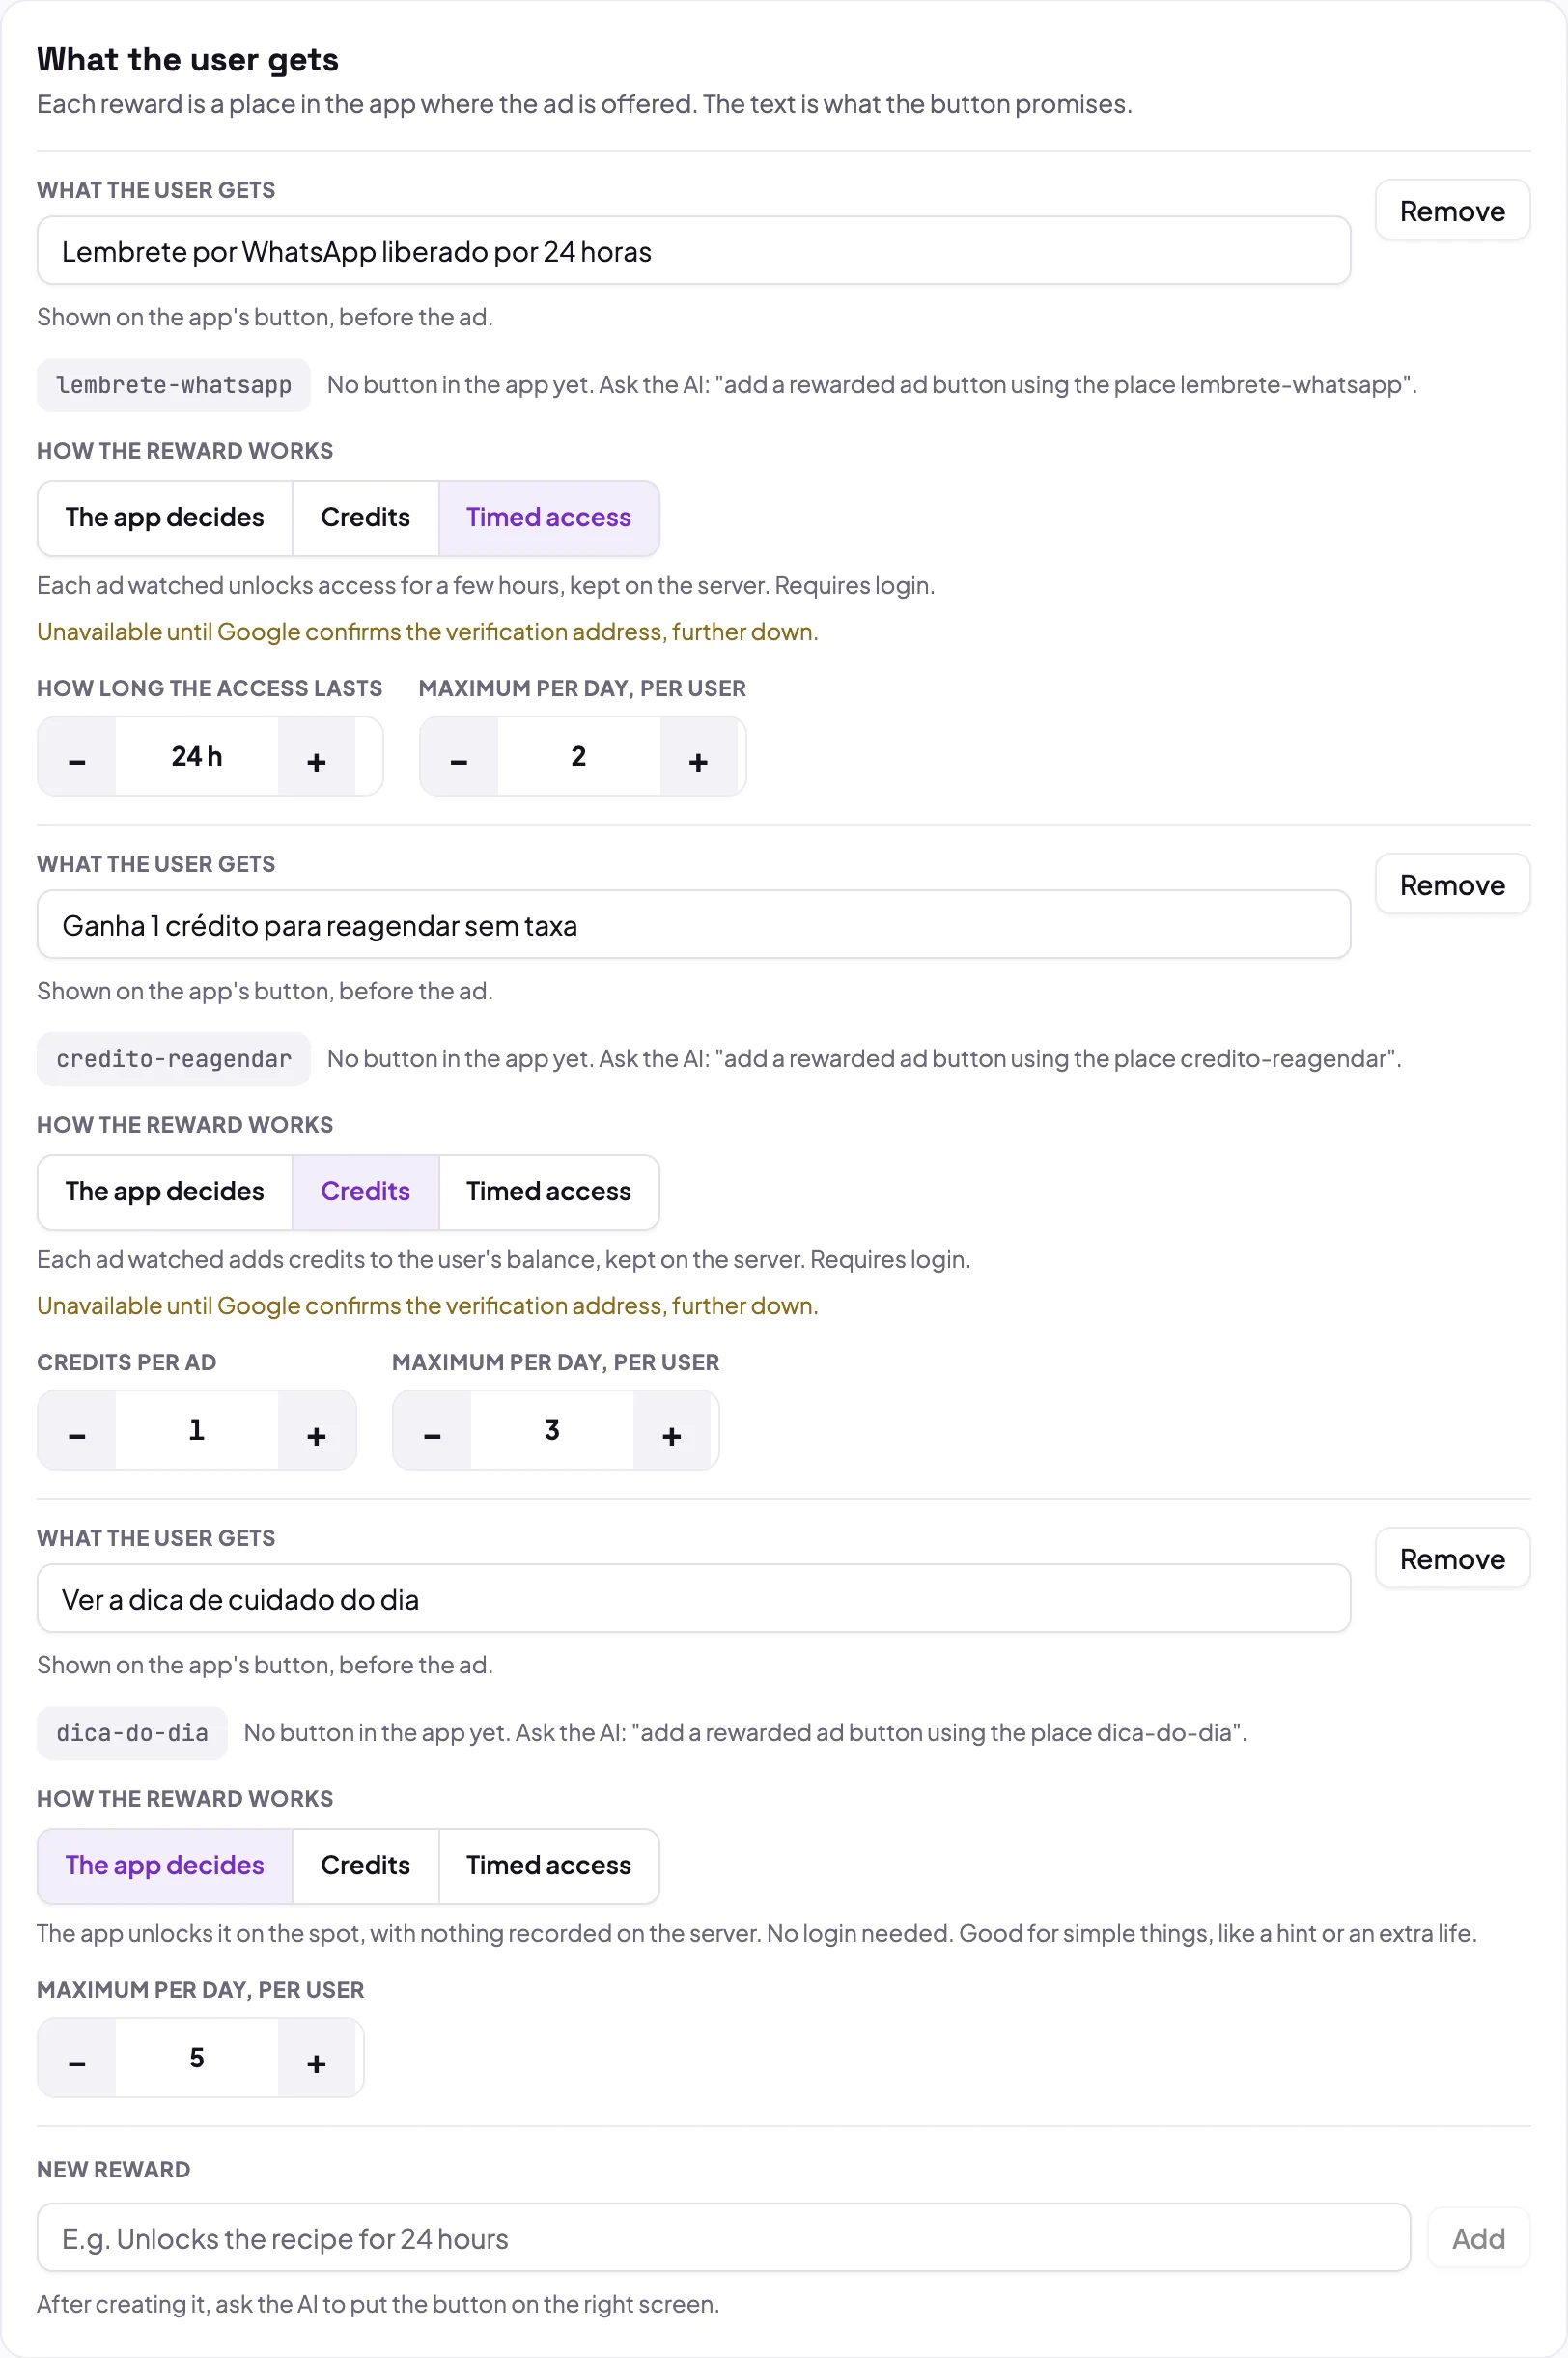
Each reward has a type, under How the reward works:
| Type | How it works | Needs sign-in |
|---|---|---|
| The app decides | the app unlocks it right away, with no record on the server. Good for simple things, like a tip or an extra life | no |
| Credits | each ad watched adds credits to the user's balance, stored on the server | yes |
| Timed access | each ad unlocks access for a few hours, stored on the server | yes |
Also set the Maximum per day, per user. After creating it, ask the AI to put the button on the right screen, using the identifier shown next to the reward:
Add a rewarded ad button using the place lembrete-whatsapp on the booking confirmation screen.
While the button does not exist in the app, the reward shows "No button in the app yet". Once the AI adds it, it shows Already has a button in the app.
7.2 Turn on the format and paste the ad units
Still on the Rewards tab, turn on Rewarded video and paste the IDs of a Rewarded ad unit created in AdMob for each platform.
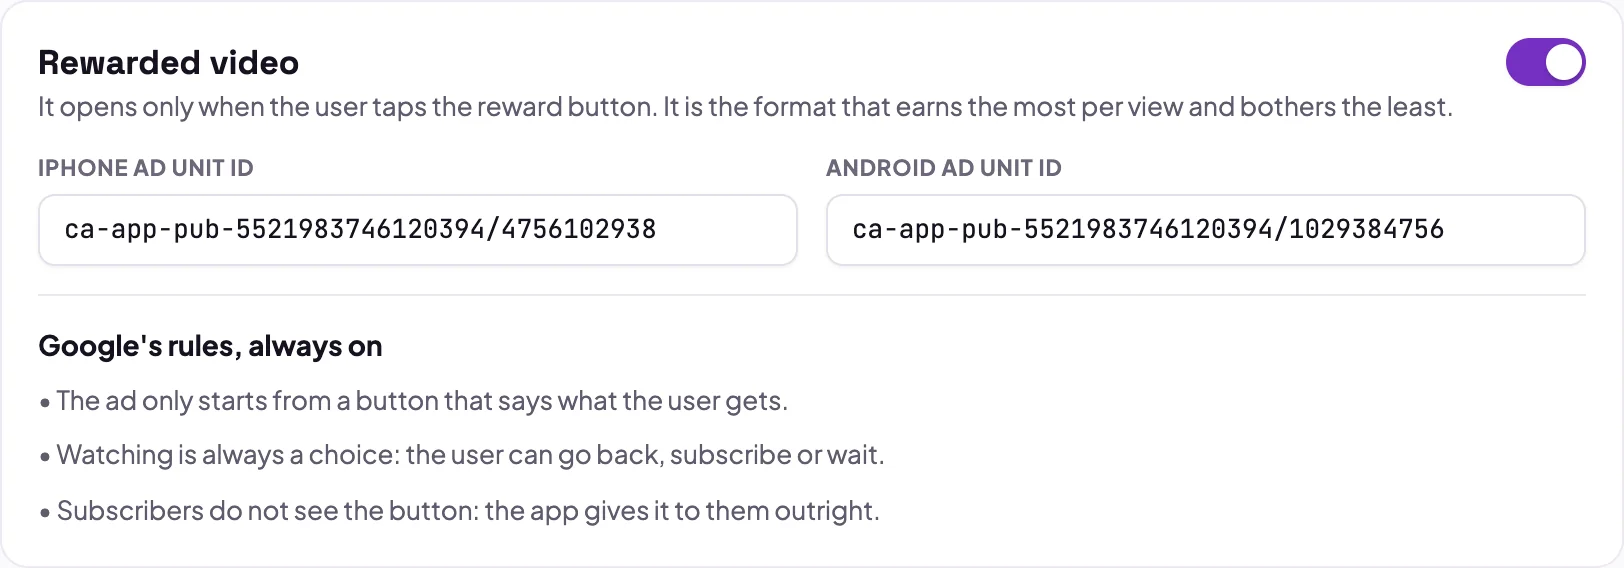
There is also the Reward without a button: at a natural pause, the app shows the prize with a 5-second countdown and a "No, thanks", and only then the ad. It only shows where you ask the AI to use it.
7.3 Turn on verification by Google
Credits and timed access are only recorded when Google's server tells ours that the ad was watched to the end. This stops anyone from getting a reward without watching. To turn it on:
- on the Verification by Google card, click Copy address;
- in AdMob, open Apps › Ad units and the rewarded ad unit;
- under Advanced settings, turn on server-side verification and paste the address;
- click Verify URL and save. Repeat on the other platform's ad unit;
- go back to the Studio and click Check again.
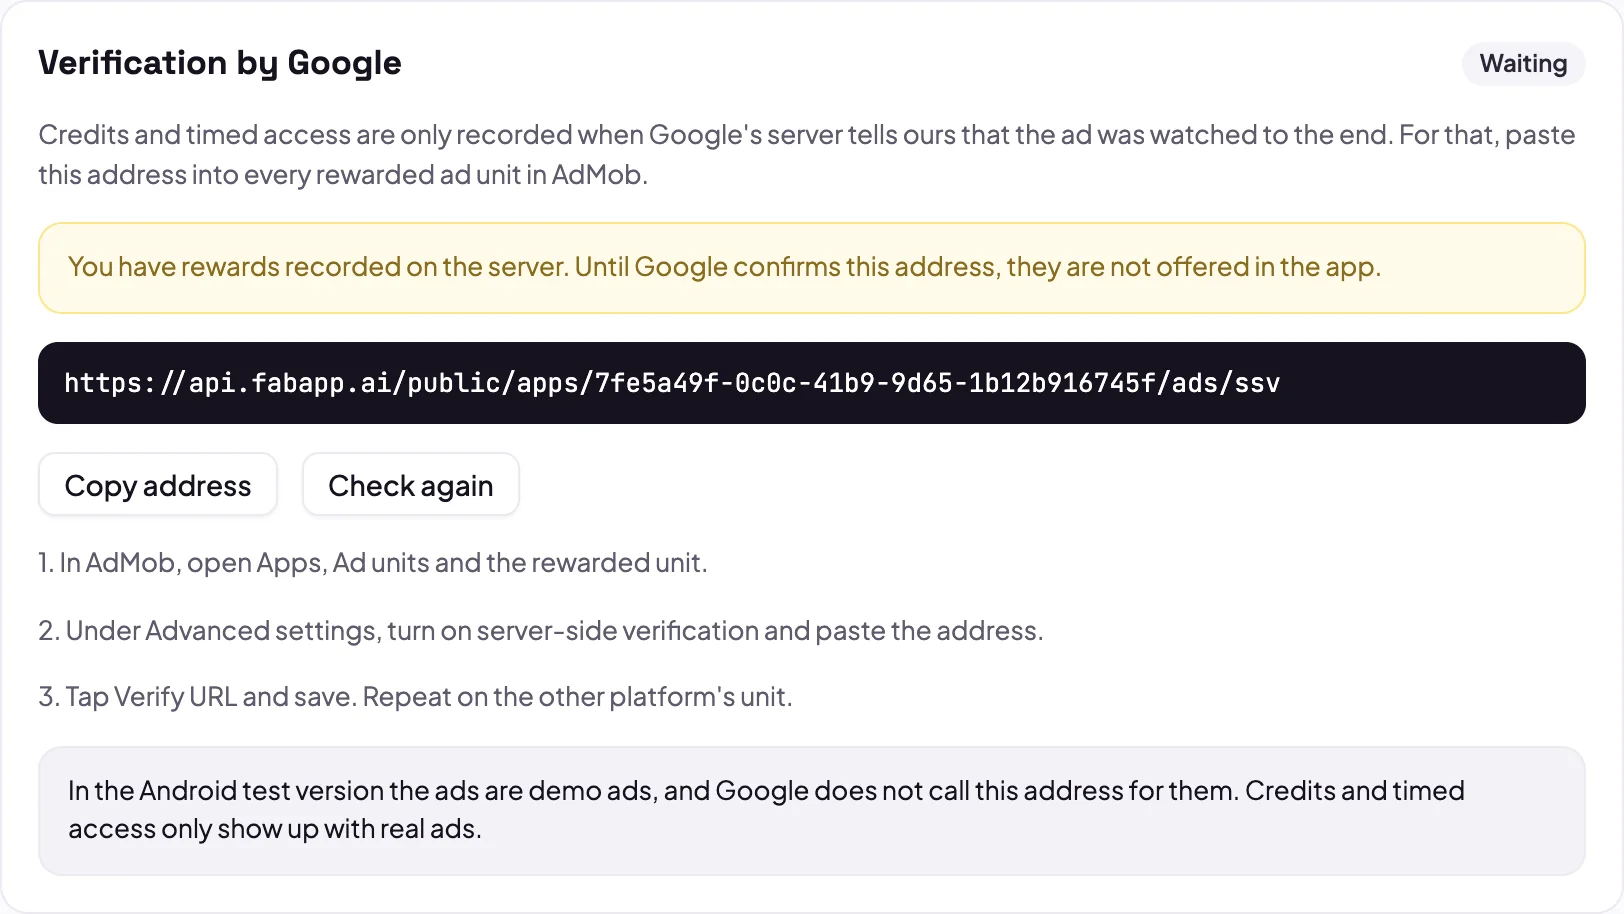
While the status is Waiting, credits and timed access rewards stay hidden in the app. Rewards of the The app decides type work right away.
Step 8: privacy and audience
The Privacy and audience tab gathers what the laws and the stores require. Do it once and forget about it.
Consent in Europe and the US
The app shows Google's privacy message when the local law requires it. You create the messages once in AdMob, under Privacy & messaging: the European message (GDPR), required for Europe, the UK and Switzerland, and the US states message.
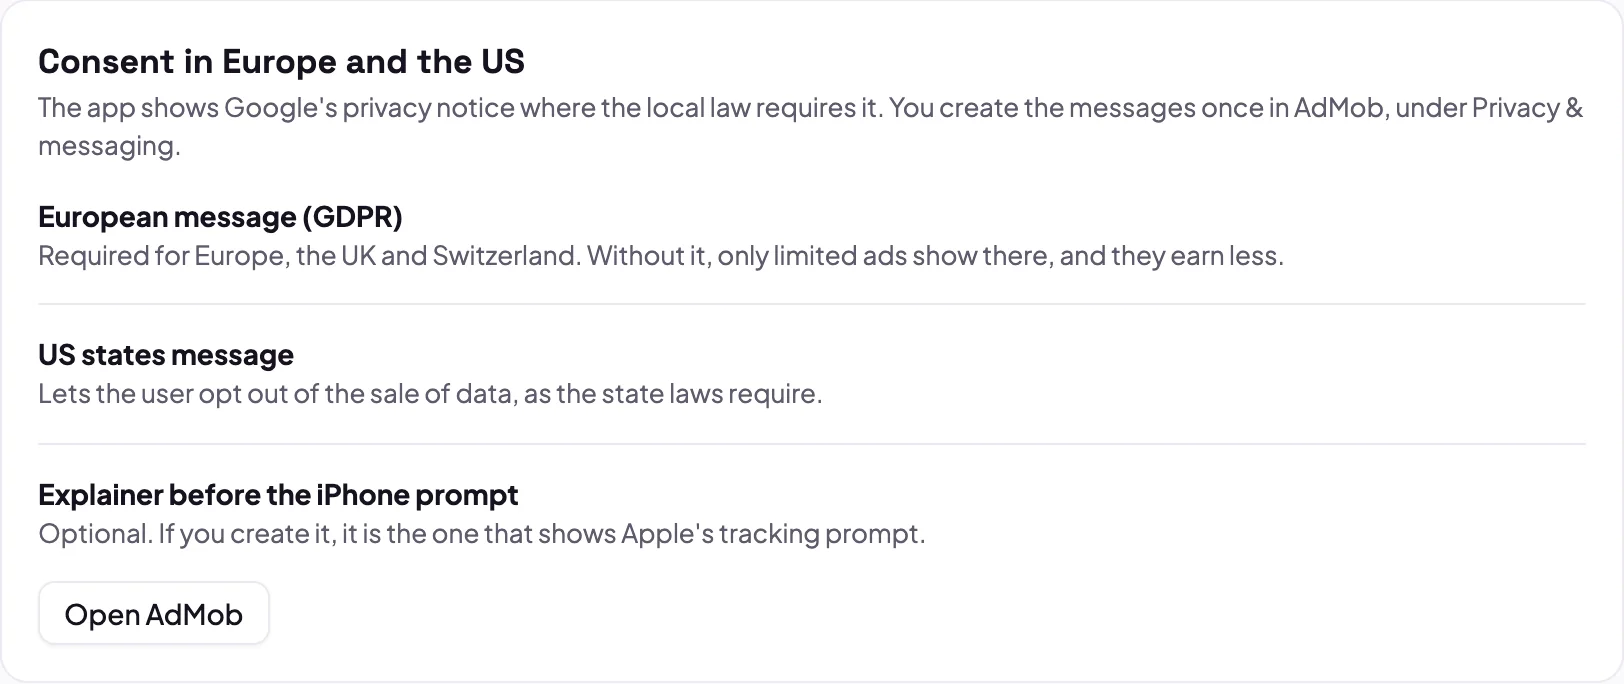
Brazil (LGPD)
Google has no message of its own for Brazil. With the Brazil (LGPD) option on, the app asks on first launch whether the user accepts personalized ads. Anyone who declines still sees ads, without personalization, and can change their choice later.

Ad reports
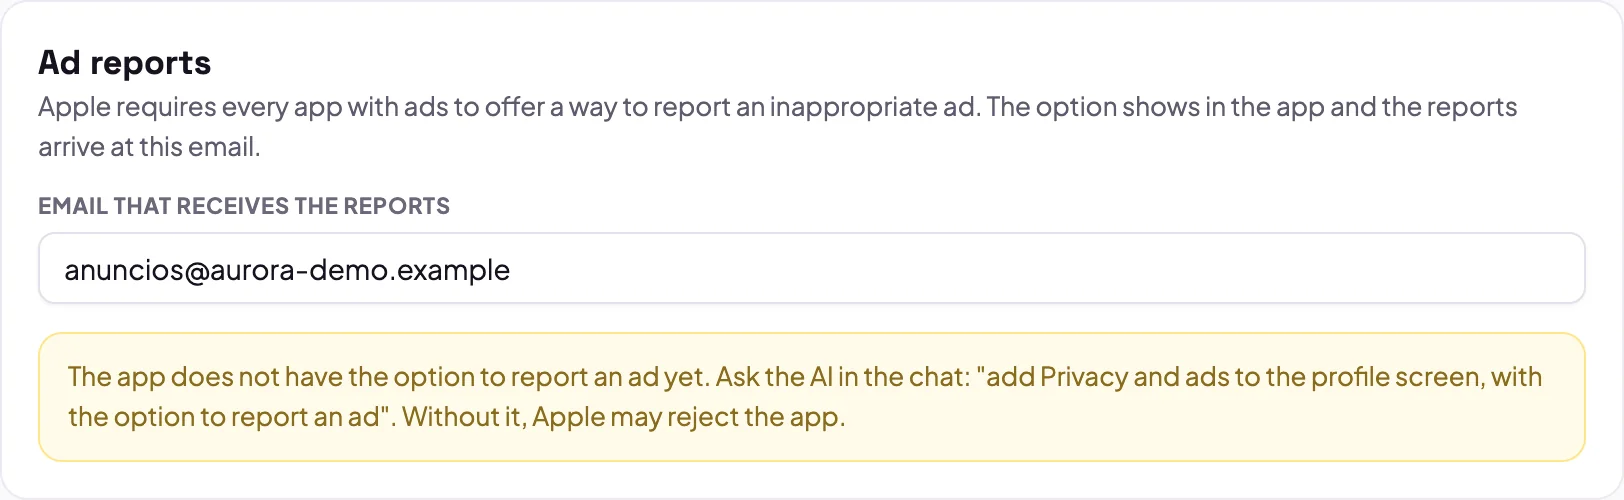
Apple requires every app with ads to have a way to report an inappropriate ad. Enter the email that receives the reports and ask the AI to create the option in the app:
Add Privacy and ads to the profile screen, with the option to report an ad.
Audience and rating
Under App audience, choose between All ages, Teens and Made for children. Under Maximum ad rating, the recommended value is Parental guidance (PG).
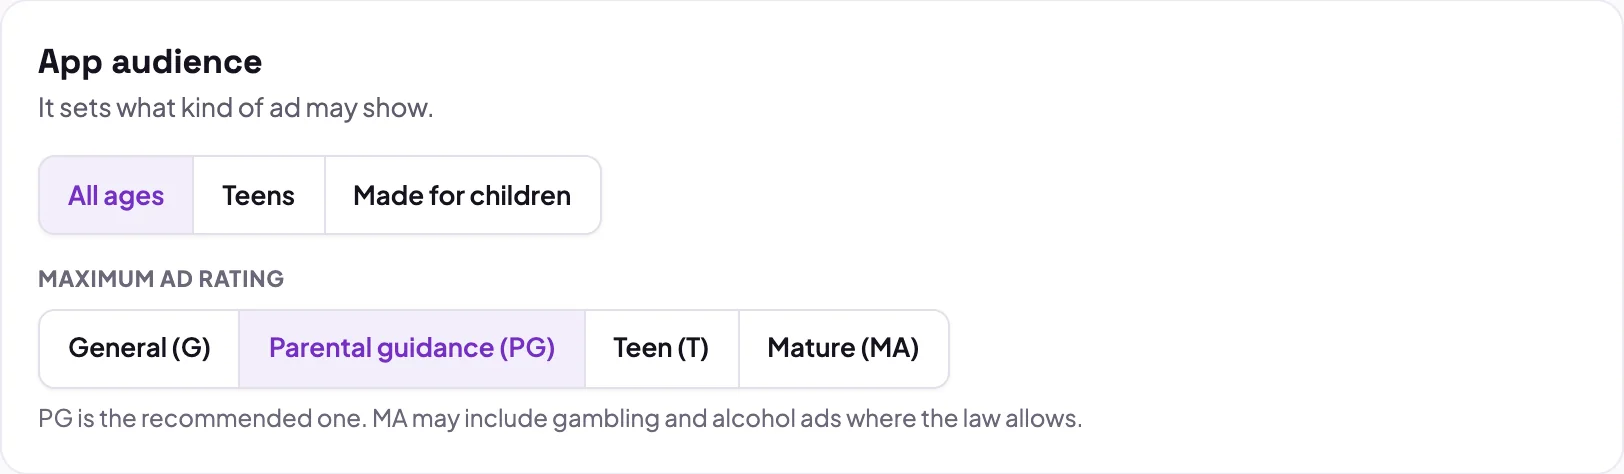
In an app made for children, Fabapp locks the rest for you: only general ads, no personalization, no app open ad and no AdSense inside the store app.
Step 9: AdSense on the website and web app
AdSense shows ads in the app opened in the browser and in the app installed from the home screen. It needs your own
domain: Google does not approve a site on a .fabapp.app address, because the main domain is not yours. Connect
your domain in the Domains stage first (the Studio lets you set everything up even without it, and shows the
warning while it is missing).
- Create the account at adsense.google.com and add your domain as a site;
- under Account › Settings › Account information, copy the Publisher ID, which starts with
ca-pub-; - in the Studio, on the Website (AdSense) tab, paste the ID and turn on AdSense on the website and web app;
- publish the app again: what you change on this tab takes effect from the next publication.
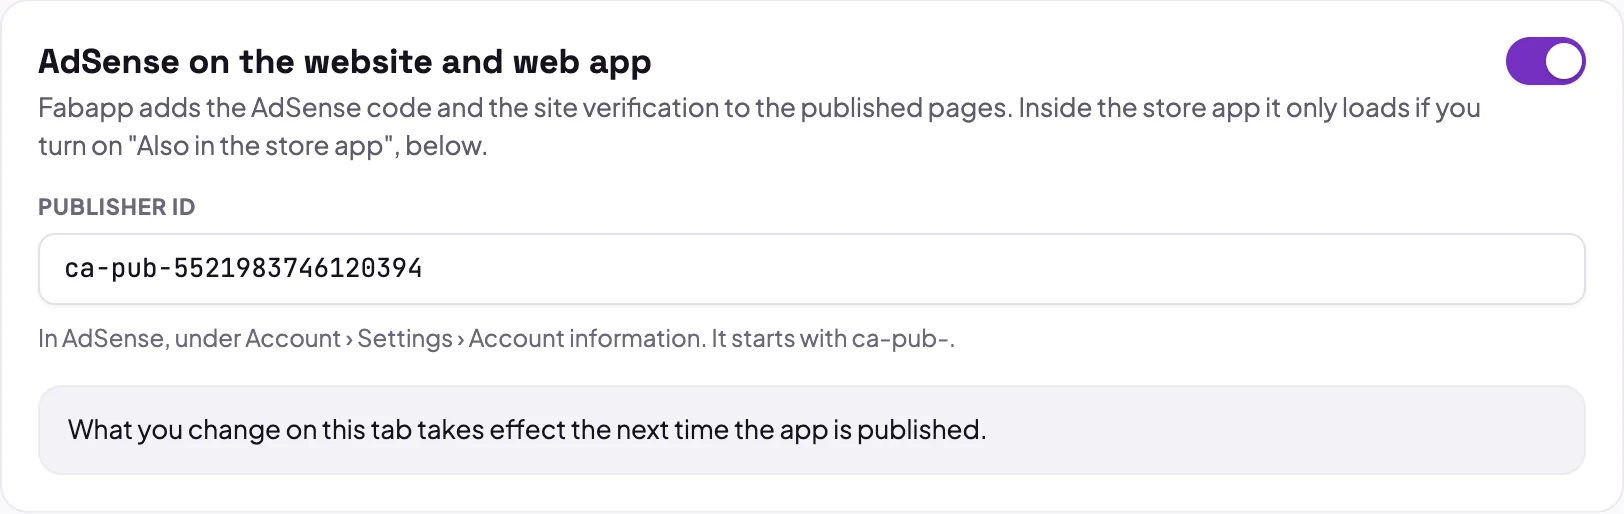
Fabapp adds the AdSense code and the site verification, which Google asks for before approving, to the published pages. Inside the store app, AdSense does not load unless you turn on Step 11.
If the project already used AdSense through the old integration, under Integrations, the tab shows the ID already in use and the Manage here button. The site keeps its ads until you bring the setup over here.
The site's ads.txt file
Like the app's file, ads.txt proves that you authorize the sale of the ads. Google reads the file at the root of
your domain. The screen shows the exact line and the Check now button, which opens the file where Google will read
it and tells you whether your line is there.

Watch out if the app is on a subdomain, such as app.yourcompany.com. Google only reads the file at the root
(yourcompany.com), which Fabapp does not publish. In that case the screen warns you: copy the line and add it to the
ads.txt of your main website, then click Check now.
Step 10: slots inside the content
Besides auto ads (which Google places on its own, and which you turn on in the AdSense dashboard, under Ads › By site), you can have slots in places you choose: between the items of a list, at the end of a page.
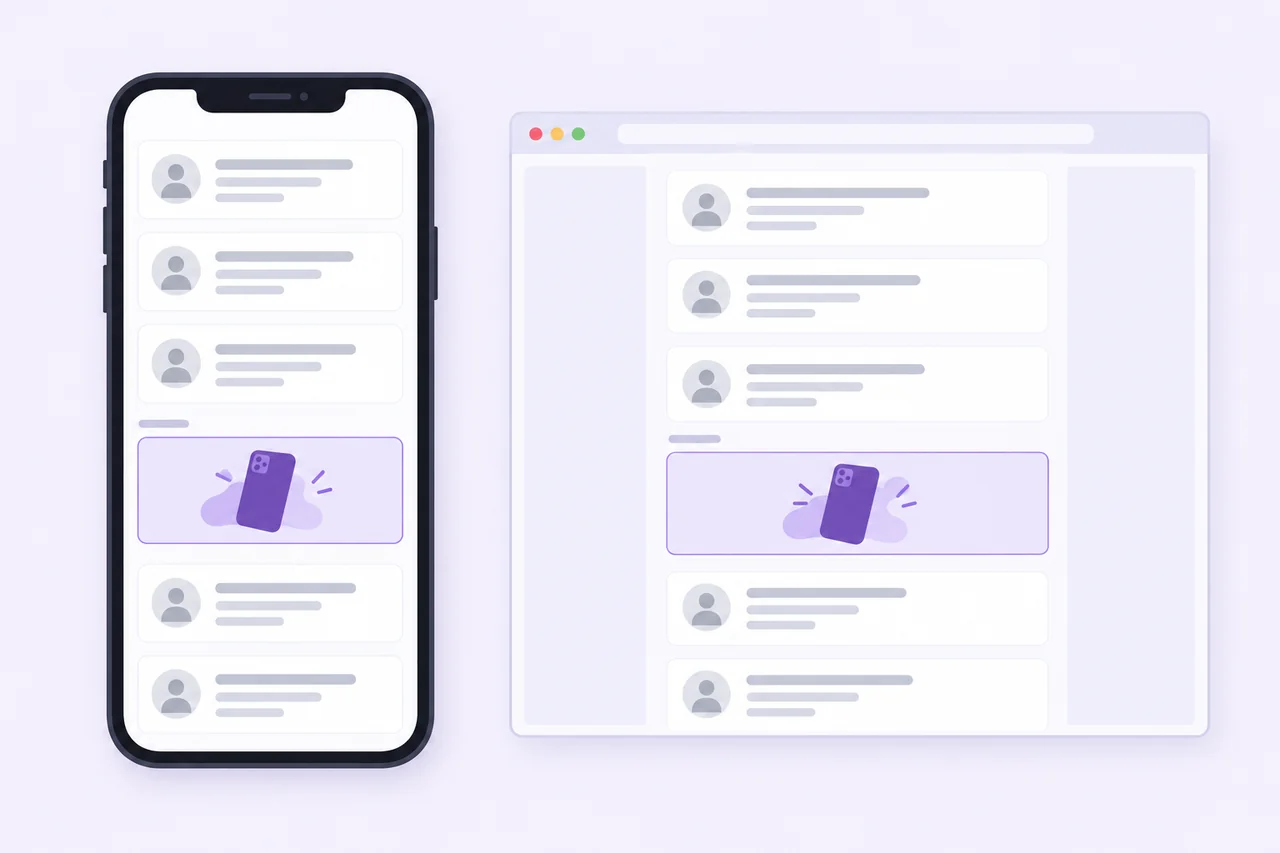
- In AdSense, under Ads › By ad unit, create a Display ad unit (or In-feed, for lists) and copy the
number that appears in
data-ad-slot; - in the Studio, under In-content slots, type a name in New slot (for example, Entre os horários) and click Create slot;
- paste the number into the Ad unit ID in AdSense field;
- ask the AI to put the slot on the screen:
Place the "Entre os horários" ad slot every 5 items in the list of time slots.
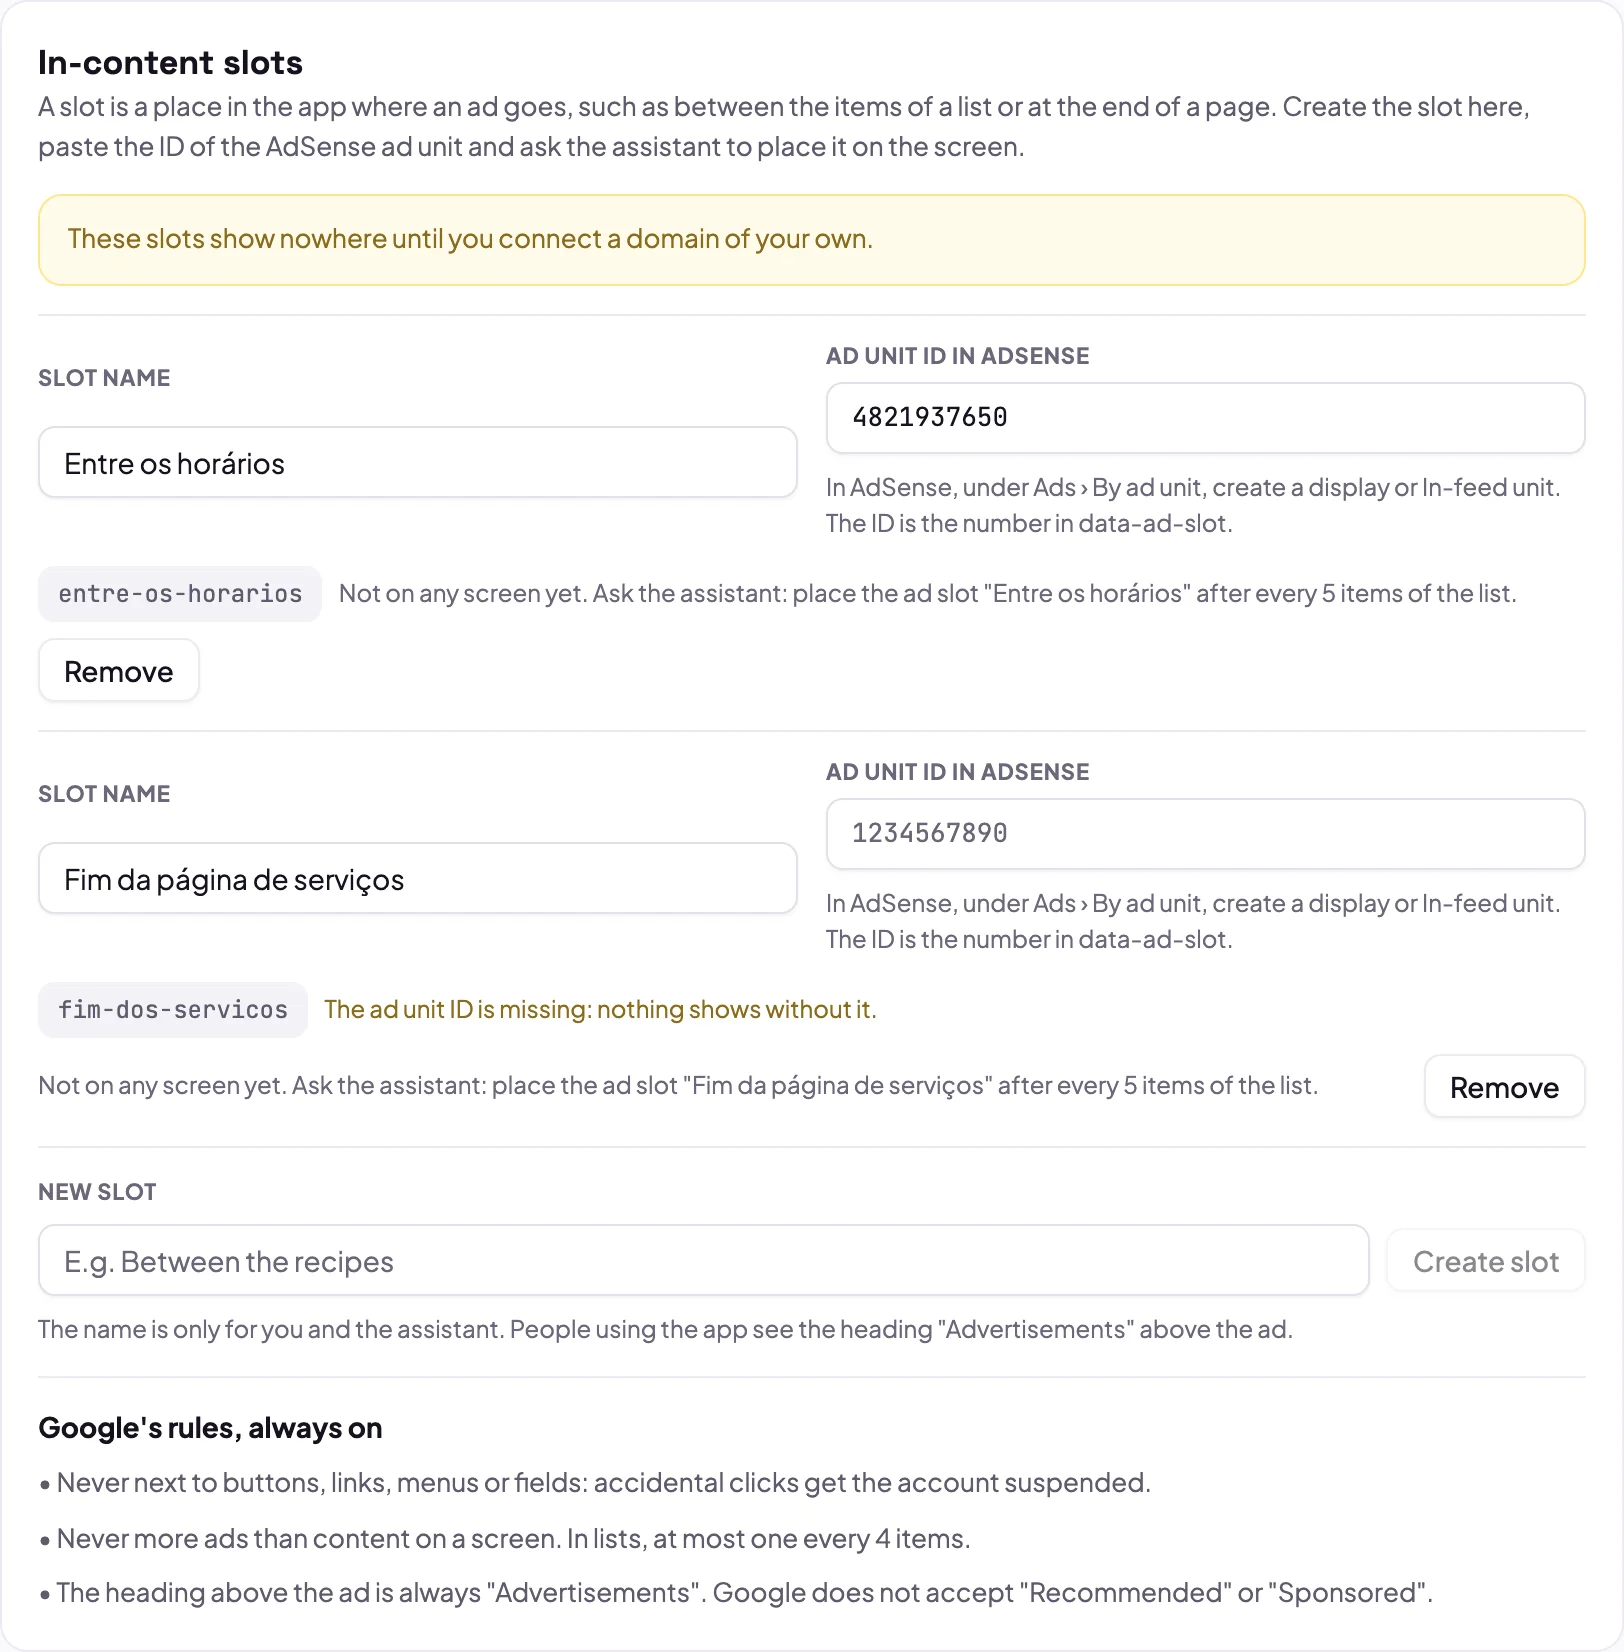
The slot name is only so that you and the AI understand each other. People using the app see the heading Advertisements above the ad, one of the few Google accepts. When there is no ad to show (no AdSense, for subscribers, on login or payment screens), the slot simply does not appear.
Google's rules the AI already follows: never next to buttons, links, menus or fields; never more ads than content on a screen; in lists, at most one every 4 items.
Under Pages with no ads, add the pages where no slot should appear (for example, /minha-conta/*). Sign-in,
sign-up, payment and error pages are already left out. This list applies to slots; to keep pages out of auto ads, use
Page exclusions in the AdSense dashboard.
Step 11: the slots in the store app too
The same slots can appear inside the app downloaded from the App Store and Google Play. The revenue goes to your AdSense, not AdMob. To turn it on:
- have AdSense working on the website (Steps 9 and 10, with your own domain);
- on the Website (AdSense) tab, turn on Also in the store app;
- publish the website again;
- build and send a new version of the app in the Mobile app stage. The version in the store does not know how to show the slots; until the new one is approved and people update, the store app stays without them.
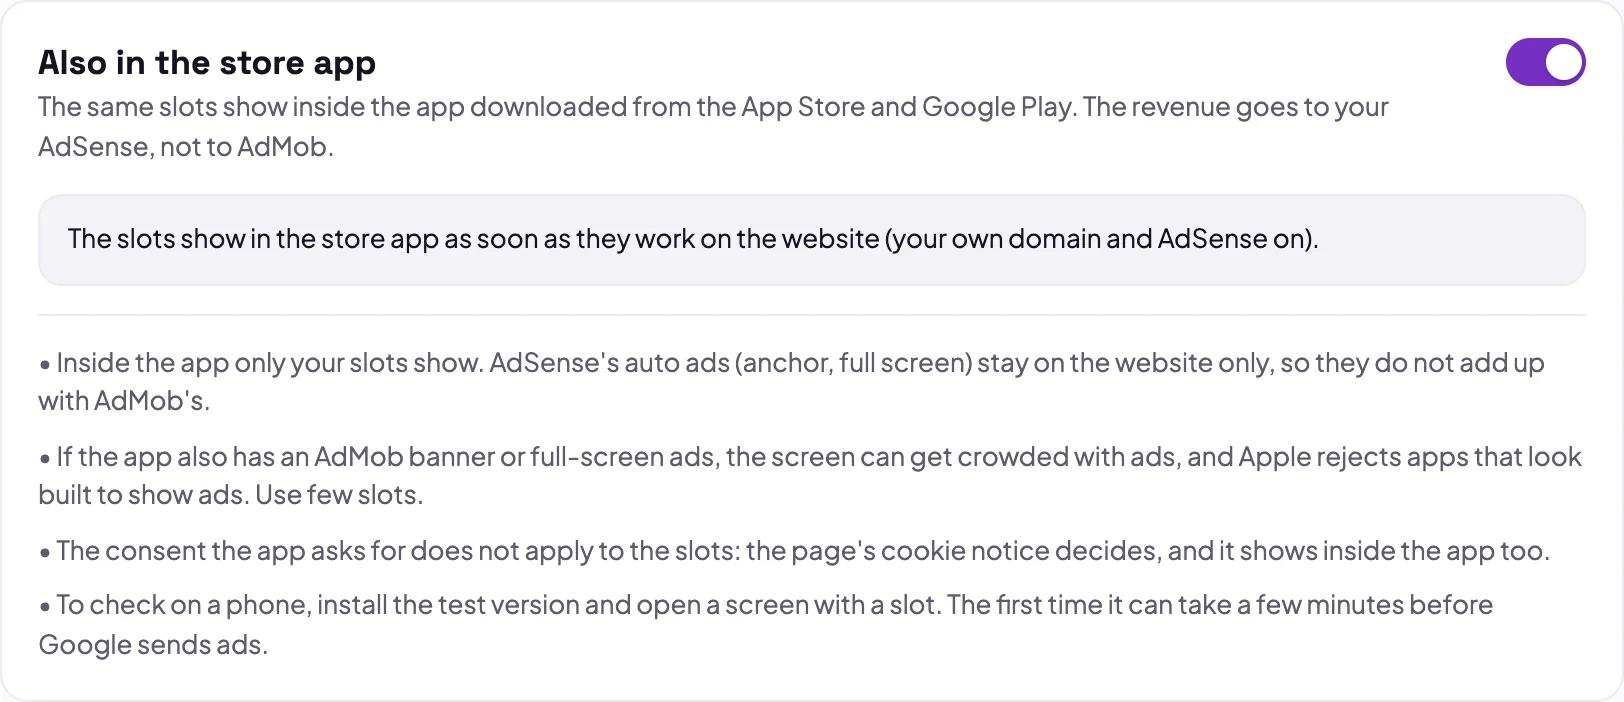
Only your slots appear inside the app: AdSense auto ads (anchor, full screen) stay on the website only, so they do not add up with the AdMob ones. Even so, if the app also has a banner and full-screen ads, use few slots: Apple rejects an app that looks built to display ads. In an app made for children this option does not exist.
Step 12: before publishing to the store
An app with ads has to declare it in the stores, and the store can take the app down if the answers do not match what it does. The Before publishing tab has the right answers for Google Play Console and App Store Connect.
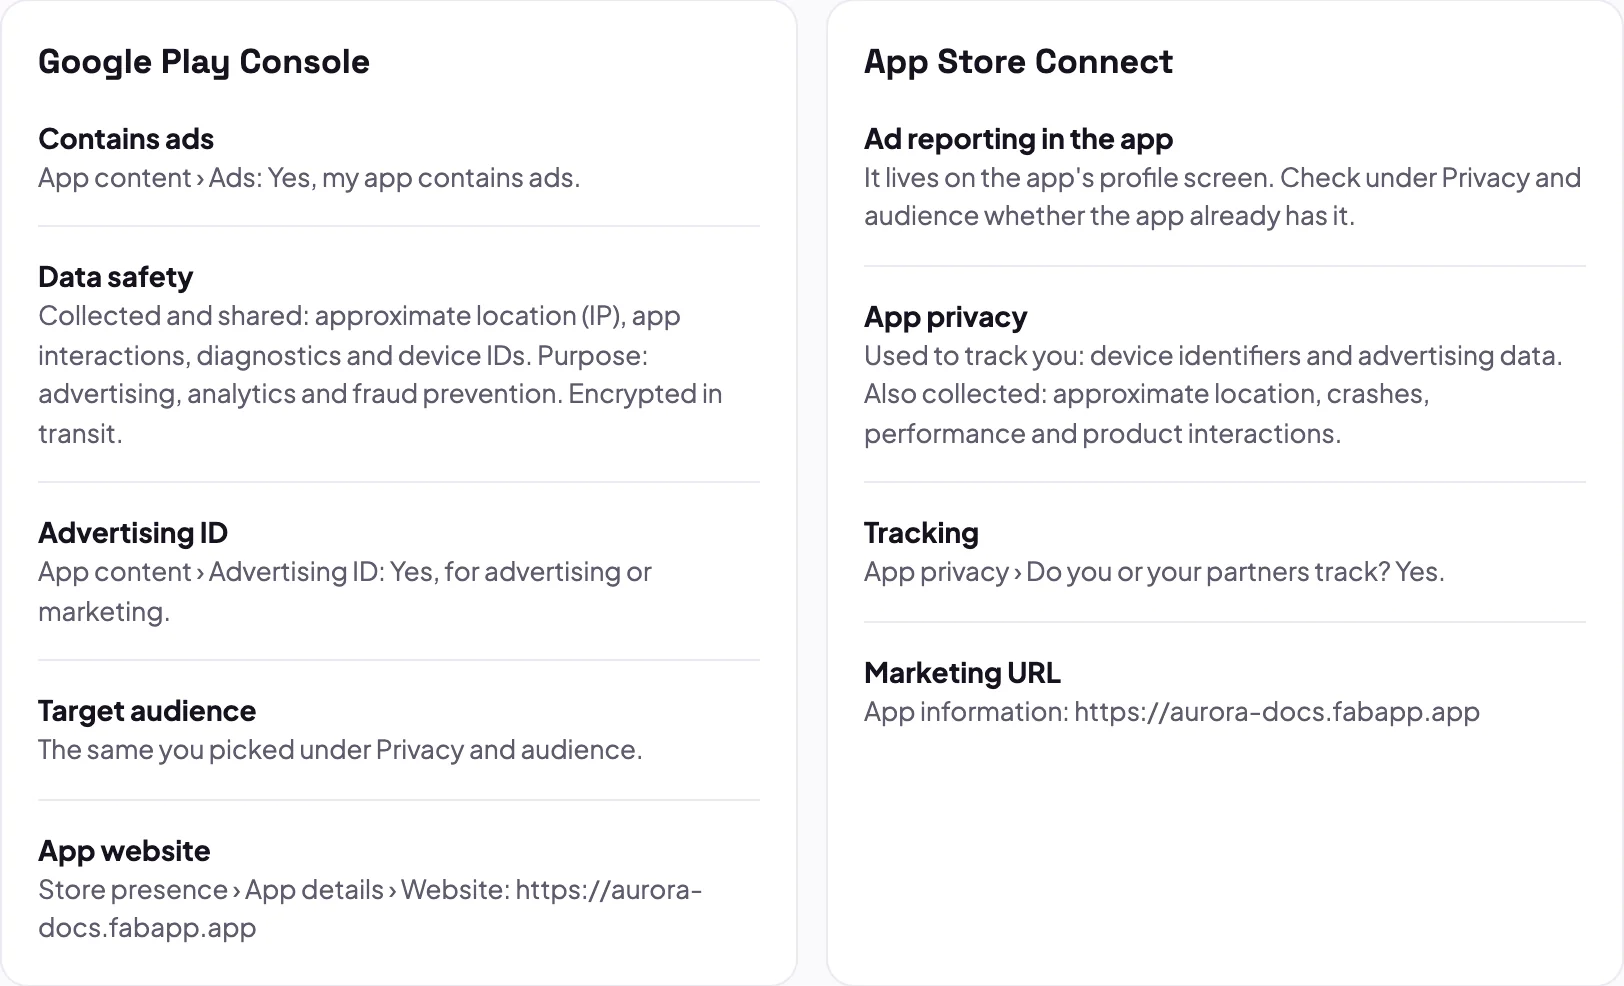
After the app is in the store:
- in AdMob, link the app to the store under Apps › your app › App settings, for iPhone and for Android;
- wait for Google's review, which takes 2 to 3 days. Until then few ads appear, and that is normal;
- on the Account and app tab, under Status in AdMob, mark what AdMob shows: Requires review, Getting ready, Needs attention or Ready.

If Needs attention appears, the reason is in the AdMob Policy center. Until you fix it, no ads appear.
How to test without losing your account
Never tap your own ads. Google treats it as fraud and can close the account for good. To test safely:
- the Android test build (the Test build button, in the Mobile app stage) shows only Google's demo ads. Tap as much as you like;
- on iPhone, the test version goes through TestFlight and shows real ads. Register your device in AdMob, under Settings › Test devices, with the phone's advertising ID, and it will receive only test ads;
- credits and timed access are only recorded with real ads, because Google does not call the verification for demo ads.
Paying users see no ads
In the Overview, the Paying users see no ads option comes turned on. It applies to anyone on your app's premium plan, by subscription or a store purchase, and hides the banner, full-screen ads, the app open ad and the AdSense slots. With rewards, subscribers do not see the button: the app gives it to them outright. To sell this plan, see in-app purchases.
When an ad does not show
| What happens | The most common reason |
|---|---|
| No ads in the store app | the app is still under review in AdMob (Requires review or Getting ready), or the status is Needs attention |
| Few ads in the first weeks | normal: Google learns the app's audience little by little |
| The reward button does not show | the reward is credits or timed access and Verification by Google is still Waiting, or the user is not signed in |
| AdSense slot empty on the website | your own domain is missing, the site is not yet approved in AdSense, the ad unit ID is missing, or the site was not published after the change |
| AdSense slot does not show in the store app | Also in the store app is not turned on, the website was not published again, or the new app version was not sent |
| Subscribers see ads | the Paying users see no ads option is off in the overview |
If none of this solves it, ask the assistant in the Studio chat: it knows what is turned on in your Ads stage and tells you what is missing.
Frequently asked questions
- Google AdMob, ad formats
- Google AdMob, the app-ads.txt file
- Google AdMob, payment thresholds
- Google AdMob, server-side verification of rewarded ads (SSV)
- Google AdSense, eligibility requirements
- Google AdSense, the ads.txt file
- Google AdSense, ad placement policies
- Google, WebView API for Ads (AdSense inside an app)
- Apple, App Store Review Guidelines